How to translate your theme in PrestaShop 1.7
Theme builders: this is for you!
This article is outdated
PrestaShop’s translation system has evolved since this article was originally published in 2017. Make sure to read the latest documentation on how to use translations in PrestaShop for modules, and for themes.By now you’re probably aware that the 1.7 version comes with a new translation system and that the theme you are building can benefit from it. However, we didn’t give much details on how it works yet, so here is what you should know if you want to translate your theme for PrestaShop 1.7.
Before anything, you should identify in which case you are:
- Case 1: You are using strings that already exist in the default theme.
- Case 2: You are creating new strings in files that already exist in the default theme.
- Case 3: You are creating new strings in new files, included in the theme folder.
- Case 4: You are creating new strings in modules that depend on your theme, but aren’t included in the /modules folder of your theme.
And there are a few things you should know:
- These methods only work if you are working on a theme with a name that is not “classic”. If you’re tweaking the Classic theme and you’ve kept the “/classic” folder, your new strings won’t be detected. PrestaShop is only looking for new strings in theme folders other than “/classic”.
- The system works smoothly from the 1.7.1.1 version. If using previous versions, you might have to apply some patches.
- That doesn’t apply to email translations - we need to fix a few things first.
Now, what to do in each case?
Case 1: You are using strings that exist in the default theme.
You should re-use the strings as-is, with the same domain, and it will automatically be translated. PrestaShop will fetch the existing translations from the default translation catalog, translated by the community on Crowdin.
Case 2: You are creating new strings in files that already exist in the default theme
You should follow these few steps.
1. Use a custom domain for the new strings
Something like “Shop.Mytheme”.
It must:
- Start by “Shop”.
- Have 2 levels only. For example “Shop.Mytheme.Checkout” won’t work.
- Not be in CamelCase. For example “Shop.MyTheme” won’t work.

2. Export the language from the translation page
Go to International > Translations > Export a language and select a language.
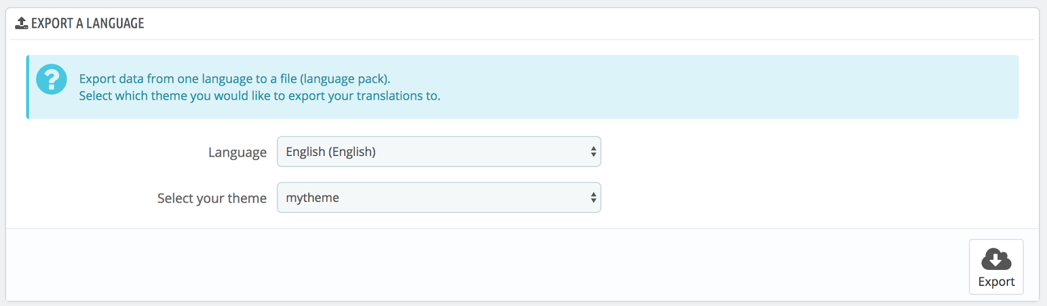
This will generate a file like “ShopMytheme.fr-FR.xlf” if you’ve chosen French, for example. If you used several domains, you will have as many files.
3. Copy the file into the translation file of your theme
If necessary, create a folder for the language.
For example, if you exported the French language, you should add the file in “translations/fr-FR”.
4. Translate the new strings using the translation page
Go to International > Translations > Modify translations. Select “Themes translation”, your theme, and the language you want to translate.
Your domain should appear in the Shop section, with all your strings:
Translate it, and save it one by one.
5. Export your theme to create the final .zip file
Once you’re done with all the translations, in all the languages you want to add, export your theme. Go to Design > Theme & Logo > Export current theme.

That implies the theme you are working on is activated, of course :)
There you go, your theme is translated!
Case 3: You are creating new strings in new files, included in the theme folder
As long as your files are indeed in the theme folder, you should follow the same process as for case 2.
Case 4: You are creating new strings in modules that depend on your theme, but aren’t included in the /modules folder of your theme
Read carefully, this one is a bit tricky.
The 1.7 translation system works for themes, and anything included in your themes. Unfortunately, it doesn’t work for third-party modules. In short: if your strings are in a module from the /modules folder, and not the theme’s folder, then the 1.7 system won’t apply. For these files, you should use the legacy system.
That means:
- Not using the trans() method from strings
- Translating all your strings yourself using the legacy translation page.
- Including the translation files in your module
When you are in the module configuration page, click Translate in the top bar to be able to translate it.
Et voilà :)
Let us know if you have any comments!
(and thanks @Atchworks for your feedback :)