Meet the new API Platform-based API in PrestaShop 9
Read how to use the new API in PrestaShop 9
A new feature in PrestaShop 9 provides the community a new, secure, modern, and extensible API based on the API Platform. In this article I will show you how to start using it.
New API in PrestaShop 9
As it was announced last year, one of the most significant projects for PrestaShop 9 has been the start of work on a new API that will eventually replace the currently available Web Services. Current web services are an outdated solution based on ObjectModel - which is expected to disappear from PrestaShop in the next few years eventually - and, apart from other flaws, are also complicated to maintain (no tests, spaghetti code).
The new solution is based on the popular API Platform version 3 and fully takes advantage of its benefits. Using a solution popular in the Symfony ecosystem should make it easier for developers to work with the API and allow them to use all the complementary tools available in it.
The new API utilizes the OAuth authorization protocol and CQRS commands for its endpoints. CQRS-based endpoints are more domain-oriented and enhance business logic management compared to traditional web services connected to ObjectModel. This approach allows us to better separate concerns, align API operations closely with business requirements, and improve maintainability and scalability.
For an in-depth understanding of API implementation in PrestaShop 9, I recommend viewing Jonathan Lelievre’s presentation. Jonathan is the Tech Lead at PrestaShop, and he offered a comprehensive overview of the new API during the PrestaShop Project Live Update.
The video linked above is outdated in a few places. We plan to release extensive developer documentation for the API soon.
Setting up PrestaShop 9
To test the new API, you need to have PrestaShop 9 installed. PrestaShop 9 Alpha 1 is now available, which means you can test the API today. Please note that for PrestaShop 9 Alpha 1, you need to build the installation ZIP from the source code.
PrestaShop 9.0 requires a minimal PHP version of 8.1. You can check the system requirements page in the developer documentation.
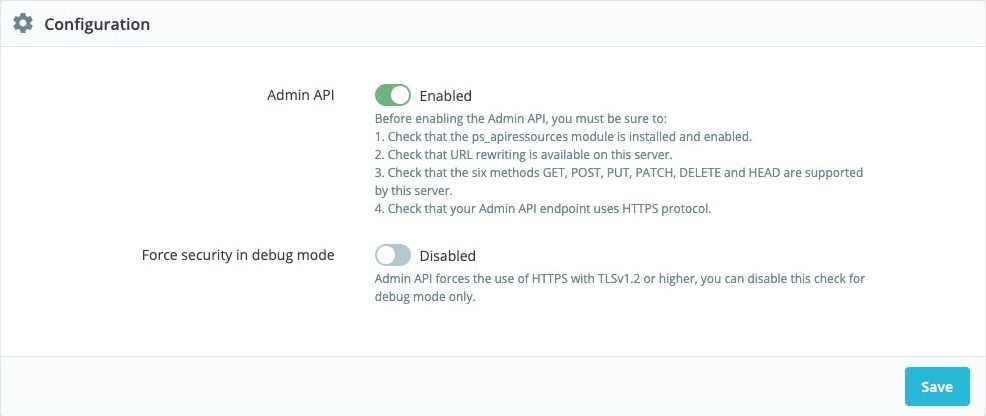
You may want to disable checking for HTTPS with TLSv1.2. To do that, go to Advanced Parameters -> Admin Api -> Configuration and disable the “Force security in debug mode” option. If you don’t see this option, make sure to enable Debug mode first in Advanced Parameters -> Performance.
Oauth2 terminology
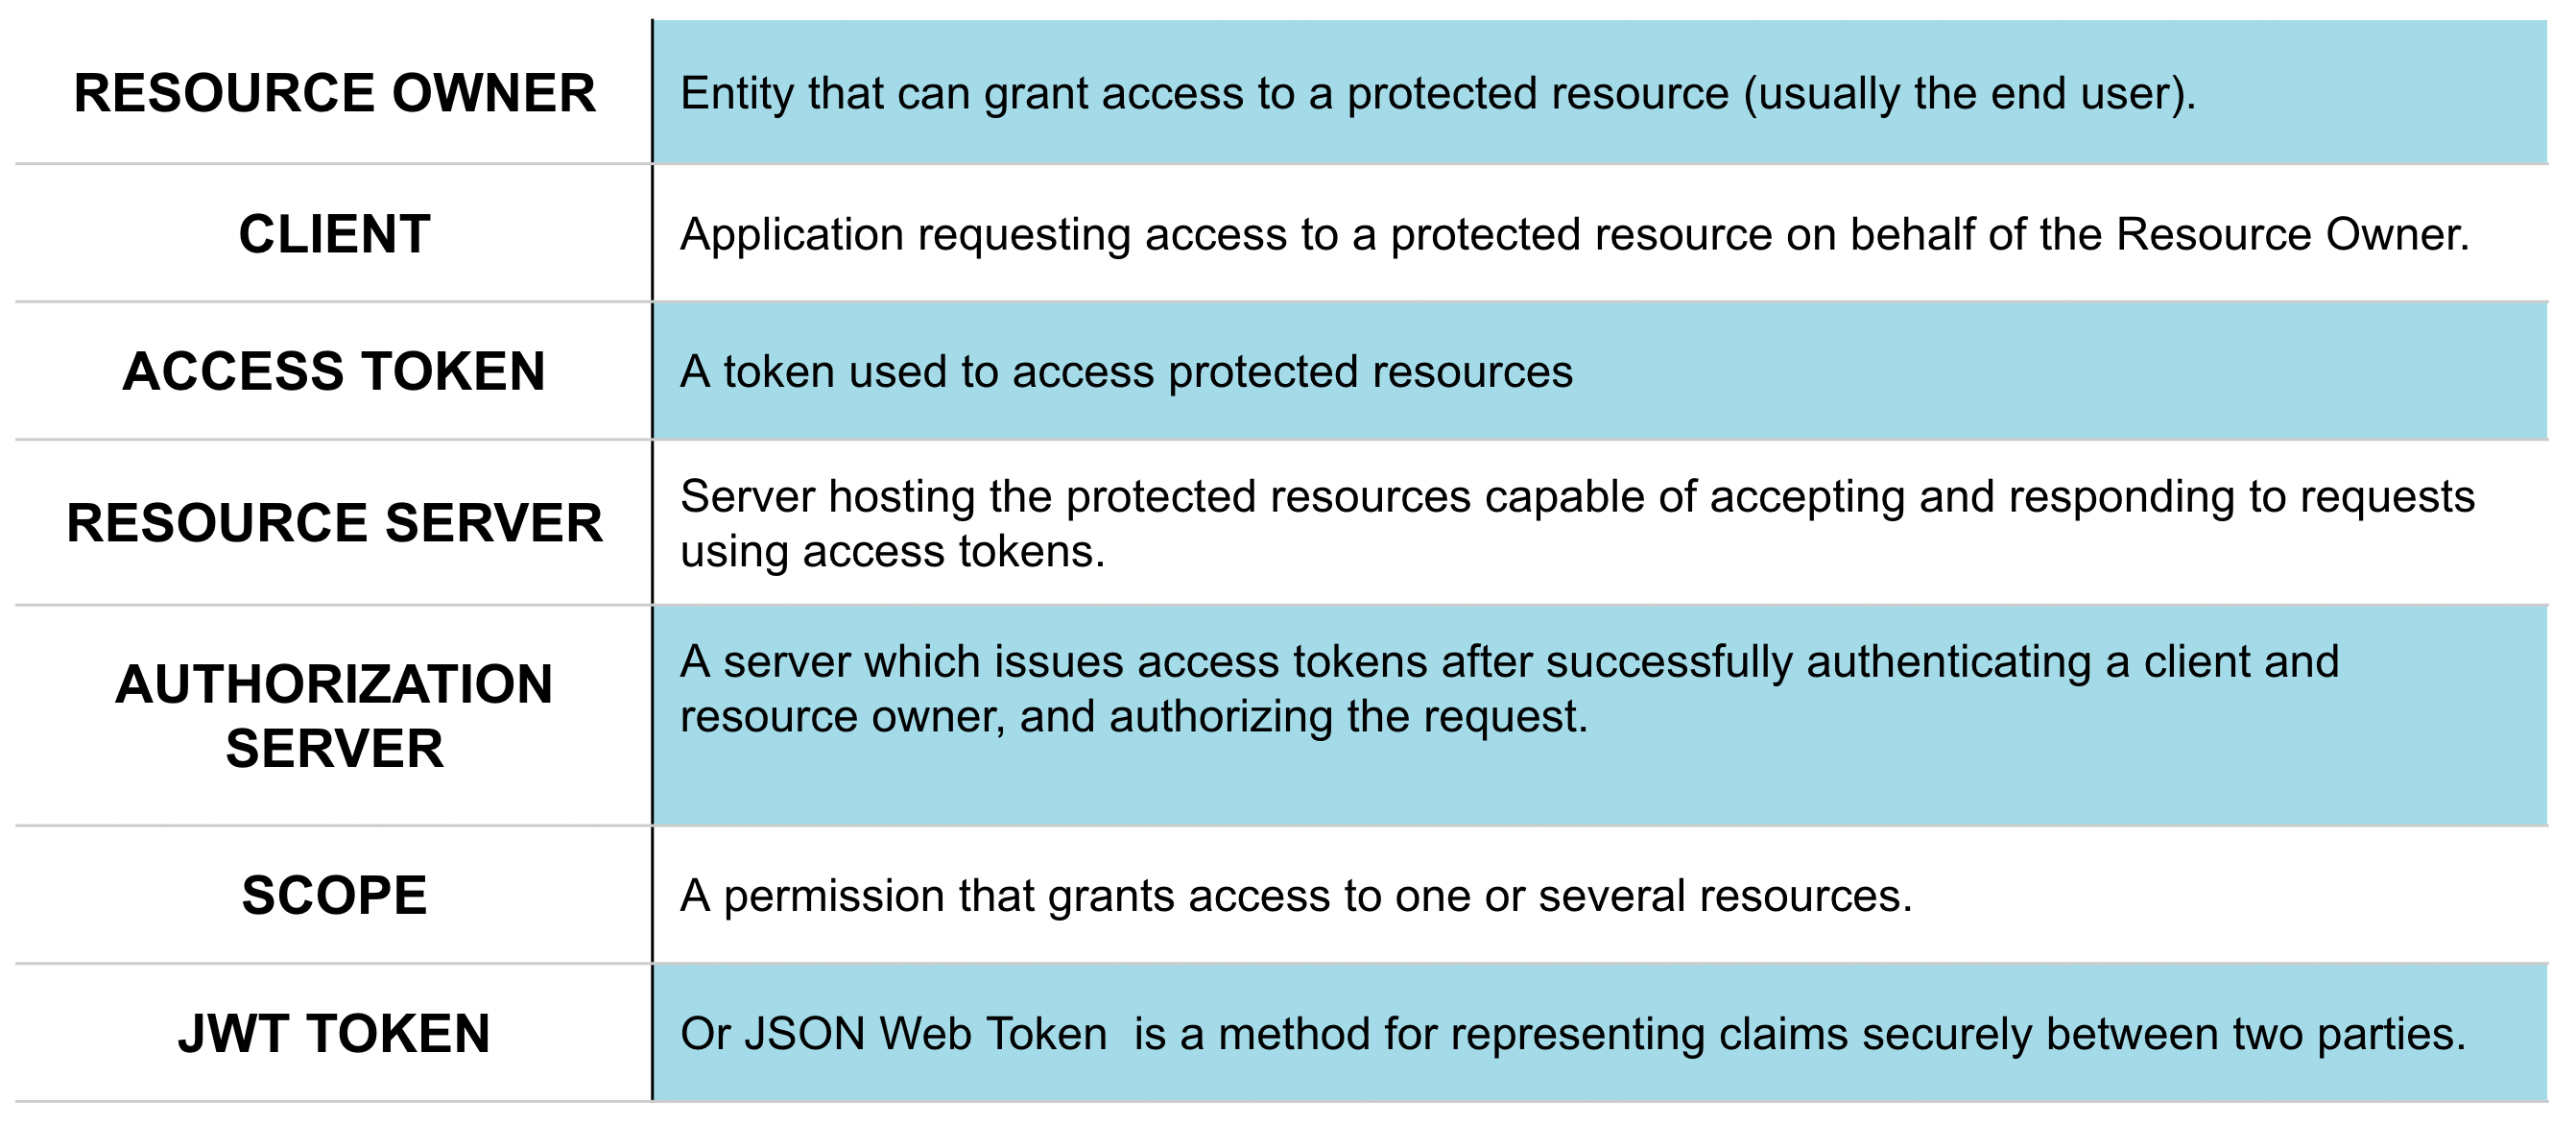
Before I continue with the tutorial, I have included a table below that will help you understand some of the terms used in this article.
Now, let’s proceed to the next step.
Create API client
Let’s create our first client. You can add as many clients to the API as you want. In the real-world scenario, you probably want to create separate client for each service you want to integrate. You will probably have clients like “My ERP integration”, “Some marketing automation tool client”, etc.
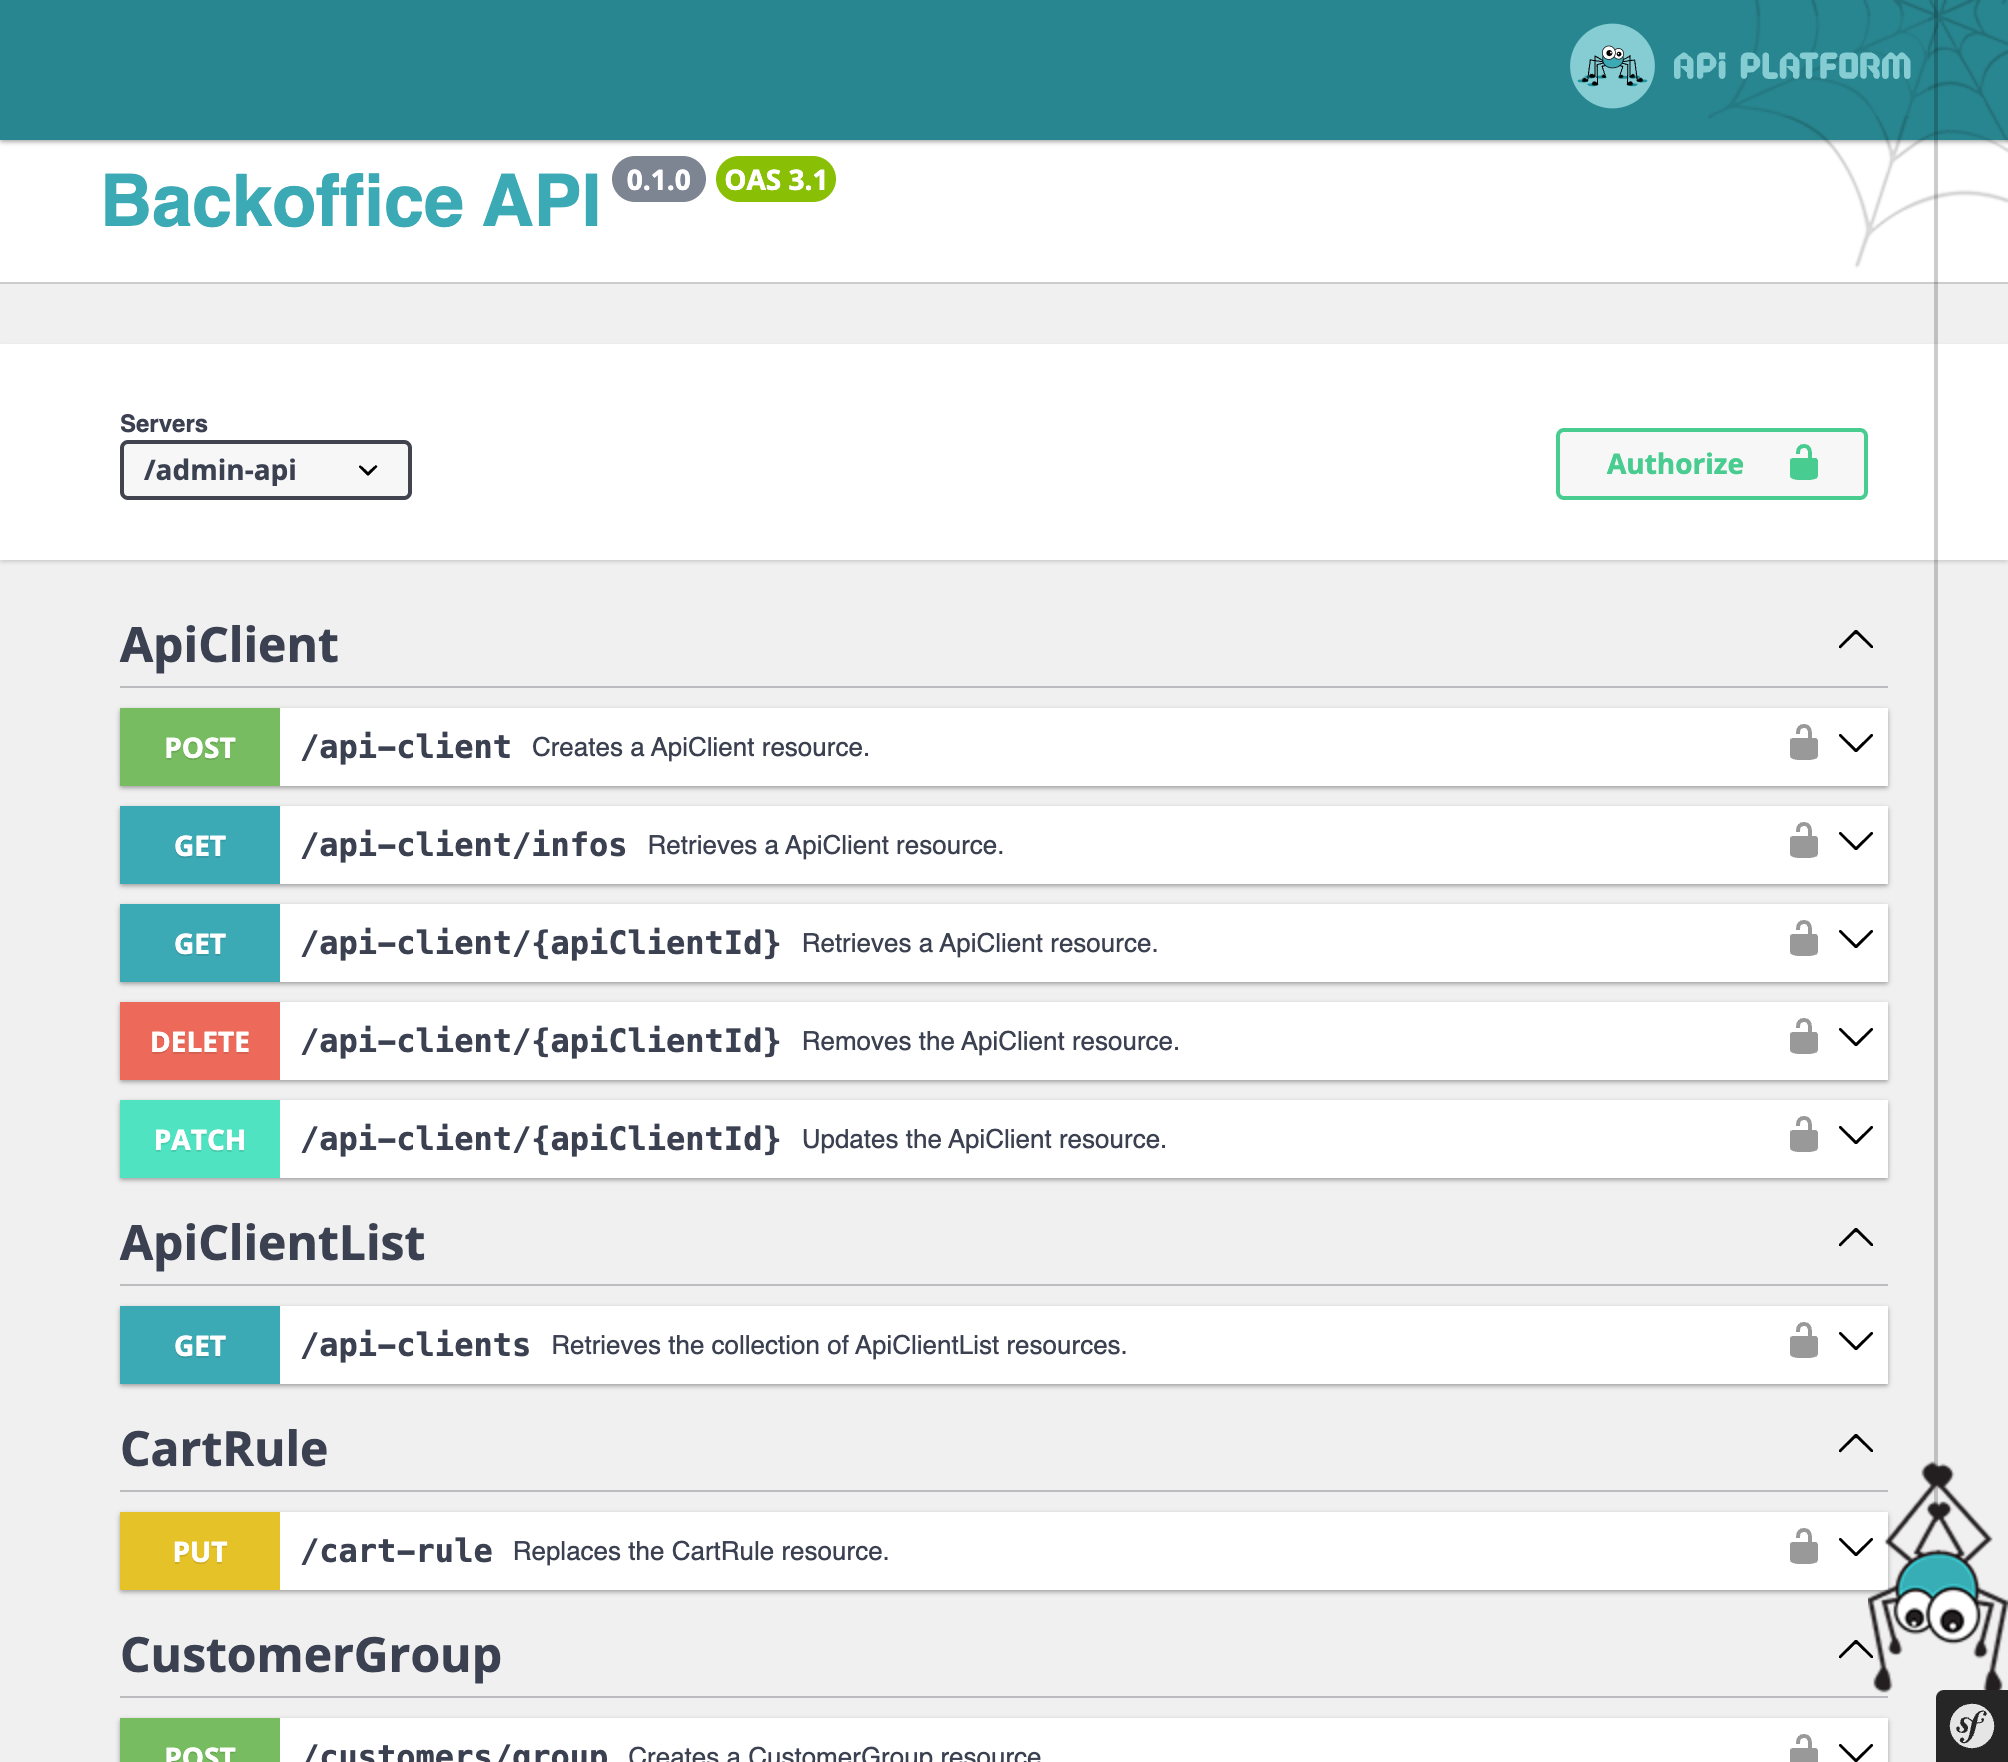
To add a new API client, navigate to Advanced Parameters -> Admin API page. Here you can see a list of all API clients, you can add a new one by clicking the “Add new API Client” button.

If you want to add a new client, you must provide information about it. In the form below, you must provide all the necessary information about the client. After that, you can click the “Generate client secret and save” button. This will generate a client secret for you and save the client in the database. It’s important to save the client secret because you won’t be able to see it again.

Form for adding a new API client
- Client name - the name of the client: it can be anything you want. It’s just for your reference.
- Client ID - the ID of the client, which is a unique identifier for the client. It should be written without spaces or special characters.
- Description - a description of the client: it can be anything you want. It’s just for your reference.
- Lifetime - the lifetime of the client. It’s the time after which the client access token will expire. In seconds.
- Enabled - if the client is enabled or not. If it’s not enabled, the client won’t be able to use the API.
- Scopes - the scopes the client can use. You can enable multiple scopes. Each time you add a new scope, you will have to adjust the client’s settings.
After you save the client, you will see the client secret, but you won’t be able to see it again. You can only see it once when you generate it. It’s important to save it because you need it to authenticate your client.
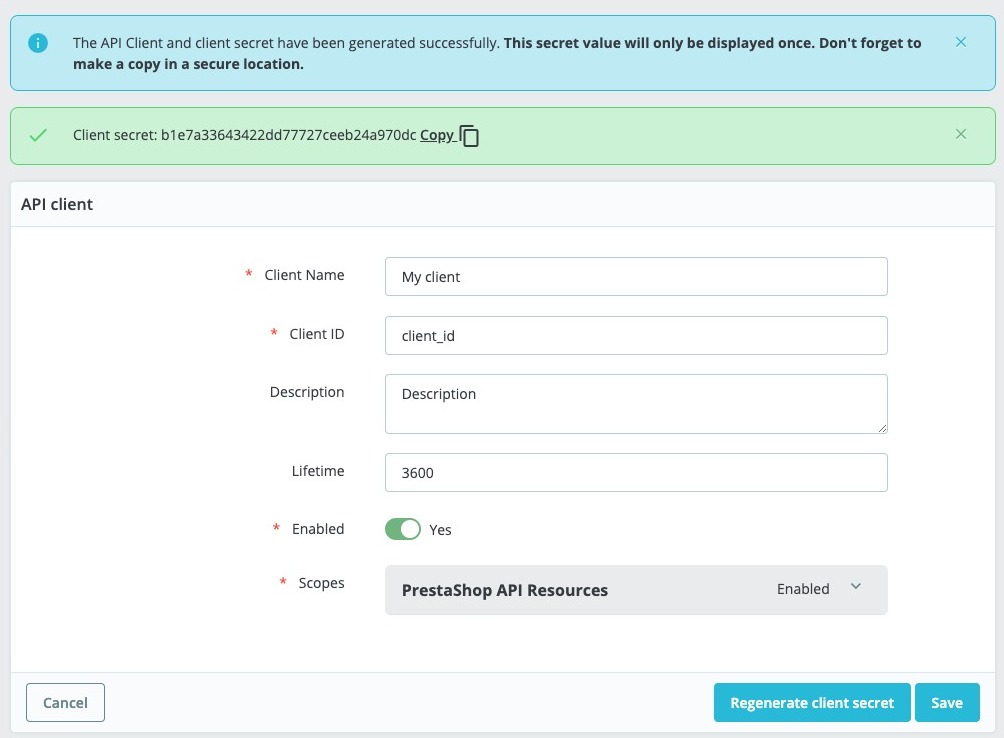
Remember to copy secret for your API Client
Client credentials grant
Now that you created your first API client, you can perform connection to the API. You can use Postman or any other tool to make HTTP requests.
The first thing we are going to do is get the access token. You need to send a POST request to the /admin-api/access_token endpoint to do that. You need to provide the following parameters:
- client_id - the ID of the client you created
- client_secret - the secret of the client you created
- grant_type - the type of grant you want to use. In this case, it’s
client_credentials - scope - the scopes you want to use. You can provide multiple scopes. In this case, we are going to use
api_client_read,api_client_write,customer_group_read,customer_group_write.
Example request using curl:
curl --location 'http://yourdomain.test/admin-api/access_token' \
--form 'grant_type="client_credentials"' \
--form 'client_id="your_client_id"' \
--form 'client_secret="your_client_secret"' \
--form 'scope[]="api_client_read"' \
--form 'scope[]="api_client_write"' \
--form 'scope[]="customer_group_read"' \
--form 'scope[]="customer_group_write"'
Example request using Postman:
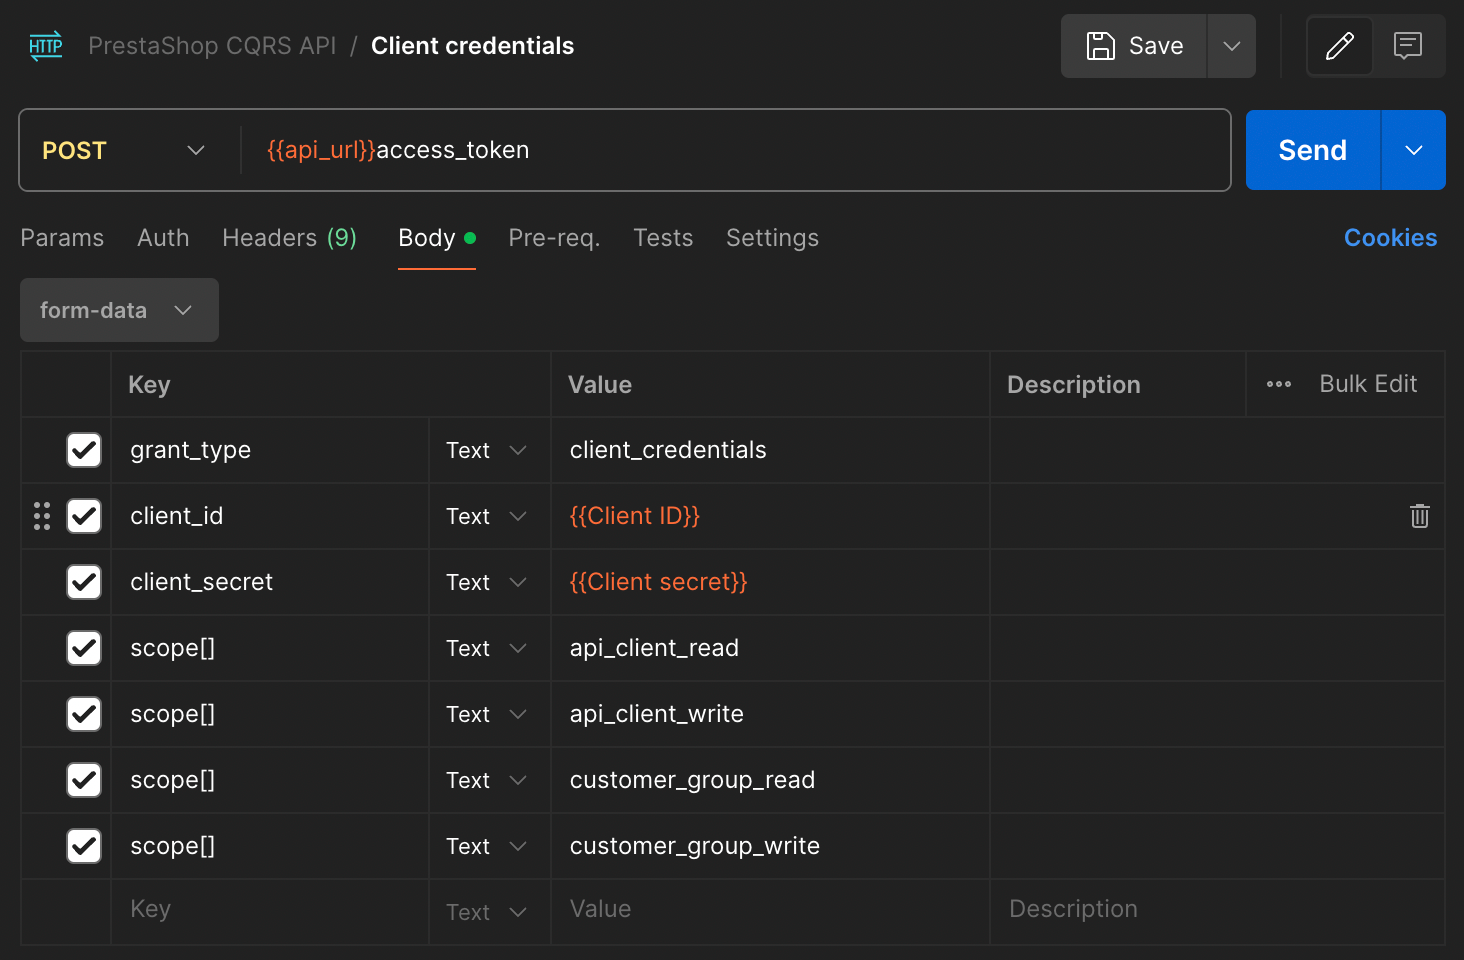
Screenshot from Postman where we retrieve access token for our client
After you send the request, you should receive a response with the access token. If you receive information saying “Use HTTPS response”, it means that you need to use HTTPS to connect to the API. As mentioned earlier, you can turn off this check in the PrestaShop back office.
If you still have problems with the connection, make sure that the API is enabled in the PrestaShop back office. You can check this in the Advanced Parameters -> Admin API -> Configuration page.
If everything goes well, the response should look similar to this:
{
    "token_type": "Bearer",
    "expires_in": 3600,
    "access_token": "eyJ0eXAiOiJKV1QiLCJhbGciOiJSUzI1NiJ9.eyJhdWQiOiJ0ZXN0X2NsaWVudCIsImp0aSI6ImQ5OTQzYWQzNDgwNDA3N2QyZGQ5MTBmM2E3YTVmYTdiZTQ1YmMyNzZmM2VmMjA2MGJmZjg2MzhlMzA4ZWE3OWY1ZWI1NzQ0ZmI0N2Y4MDU2IiwiaWF0IjoxNzE2Mjg2MjE5LjQ2NDA3OCwibmJmIjoxNzE2Mjg2MjE5LjQ2NDA4LCJleHAiOjE3MTYyODk4MTkuNDYzMDEsInN1YiI6IiIsInNjb3BlcyI6WyJpc19hdXRoZW50aWNhdGVkIiwiYXBpX2NsaWVudF9yZWFkIiwiYXBpX2NsaWVudF93cml0ZSIsImN1c3RvbWVyX2dyb3VwX3JlYWQiLCJjdXN0b21lcl9ncm91cF93cml0ZSJdfQ.Q6kK0Pl1HVAVrzn5xUrzRO1VSUaw-ygTn9D_rKlfjW3gllUWJiWRaA_pM53RtLId1LkcAfW8nW27CFhQH7TQqLCn4vUPD2t6_s7-3WX_HIqe6MHExib2mW7u_ZXT3bSOyPUOjWIcZsISQR1-noZfOEYDkvgnKDC250zieVqMELgxclMFXKdiLhn83GJnCW35llB1TwAACxdV1uJ_emZGCR3Tsy2IK1pSKPRAb2h-gBre8hqtCmUZ5pdM_L6D_EuUM-aB6iQENiCD6ECmSvqvsqkd3RB73s7PntwniUUafD2GHap1Ttw8pOF7omtT3X0ZLssSX1eQMPDw6JGLFz9caw"
}
You can now use the access token to authenticate your client in the next requests. You can use it by providing the Authorization header with the value Bearer YOUR_ACCESS_TOKEN.
Remember that the access token is valid for a limited time. After it expires, you need to get a new one. It is also crucial to provide scopes that your client can use. If you don’t give the correct scopes, you won’t be able to access some endpoints.
Access token is a JWT token. JWT stands for JSON Web Token that contains information about the client and the scopes it can use. It’s signed with a secret key, so you can be sure that the token is valid and hasn’t been tampered with. You can go to jwt.io to see the token’s content after you decode it.
Authorization server
The authorization server is responsible for issuing access tokens to the client after successfully authenticating the client. It is also responsible for validating the client’s credentials and providing the client with the necessary scopes.
In the new PrestaShop API implementation, the authorization server is built into the API itself, but it is modular and can be replaced with any other OAuth2 server implementation. One example is Keycloak, which is a popular open-source identity and access management solution. You can use Keycloak to manage your clients and their access to the API, and here’s an example module that shows how to integrate Keycloak with PrestaShop.
Information about the API Client
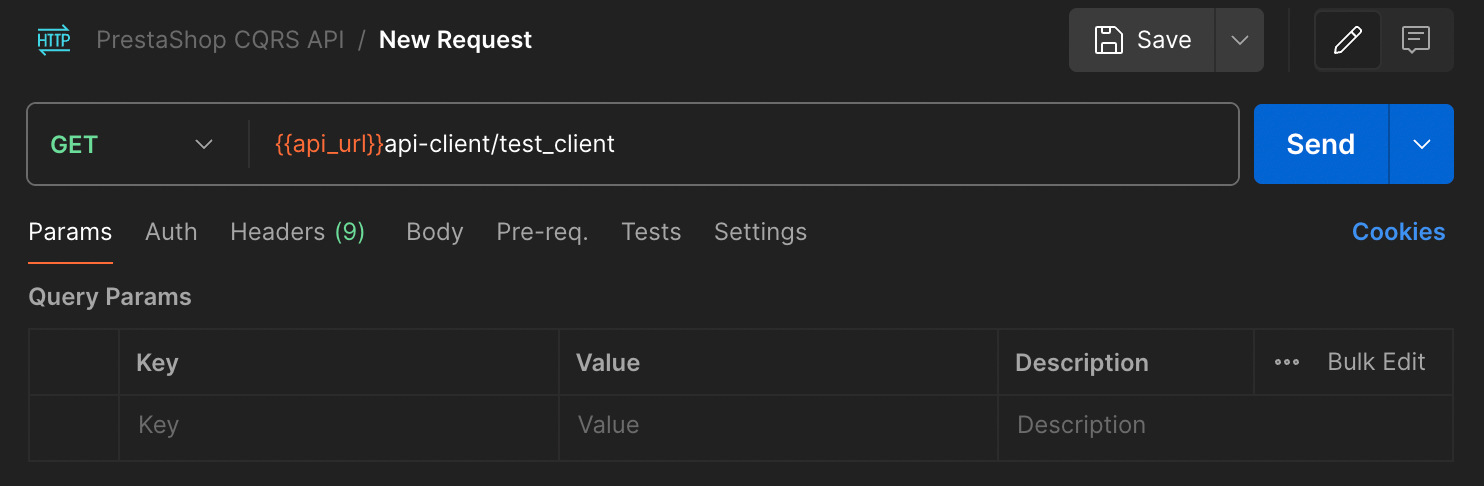
Now that we have the access token, we can get information about the API client. To do that, you need to send a GET request to the /admin-api/api-client/info endpoint and provide the access token in the Authorization header.
Example request using curl:
curl --location 'http://yourdomain.test/admin-api/api-client/infos' \
--header 'Authorization: Bearer YOUR_ACCESS_TOKEN'
Example request using Postman:
If everything goes well, you should receive a response with information about the API client. The response should look like this:
{
    "apiClientId": 1,
    "clientId": "test_client",
    "clientName": "Test client",
    "description": "",
    "enabled": true,
    "lifetime": 3600,
    "scopes": [
        "api_client_read",
        "api_client_write",
        "cart_rule_write",
        "customer_group_read",
        "customer_group_write",
        "hook_read",
        "hook_write",
        "module_read",
        "module_write",
        "product_read",
        "product_write"
    ]
}
Congrats! You have successfully authenticated your client and retrieved information about it. You can now use the access token to access other endpoints in the API.
Please note that the list of scopes may vary depending on the client you created. It is also important to note that the list of scopes here is the list of all scopes the client can use, not the list of scopes the client is using at the moment, with the generated access token.
If you request an endpoint without the required scope, you will receive an error message. For example, if you try to access the /admin-api/products endpoint without the product_read scope in your access token, you will receive the following response:
{
    "type": "https://tools.ietf.org/html/rfc2616#section-10",
    "title": "An error occurred",
    "status": 403,
    "detail": "Invalid scope.",
    "class": "Symfony\\Component\\HttpKernel\\Exception\\AccessDeniedHttpException",
    "trace": []
}
Retrieve a single resource
Now that you have a better understanding of how to authenticate your client and retrieve information about it, you can try to retrieve other resources from the API. You can use the access token you generated earlier to authenticate your client.
In the following example, we will try retrieving and saving user group information. To do that, you need to send a GET request to the /admin-api/customers/group/{customerGroupId} endpoint, where {customerGroupId} is the ID of the user group you want to retrieve. You need to provide the access token in the Authorization header.
curl --location 'http://yourdomain.test/admin-api/customers/group/1' \
--header 'Authorization: Bearer YOUR_ACCESS_TOKEN'
If everything goes well, you should receive a response with information about the user group. The response should look like this:
{
    "customerGroupId": 1,
    "localizedNames": {
        "1": "Odwiedzający",
        "2": "Visitor"
    },
    "reductionPercent": 0.0,
    "displayPriceTaxExcluded": false,
    "showPrice": true,
    "shopIds": [
        1
    ]
}
Notice that you can access the localized names of the user group and all other relevant information.
If you access the endpoint with the wrong ID, you will receive an error message. For example, if you try to access the /admin-api/customers/group/999999 endpoint, you will receive the following response:
{
    "type": "https://tools.ietf.org/html/rfc2616#section-10",
    "title": "An error occurred",
    "status": 500,
    "detail": "Group #4 was not found",
    "class": "PrestaShop\\PrestaShop\\Core\\Domain\\Customer\\Group\\Exception\\GroupNotFoundException",
    "trace": []
}
The endpoint will return a 404 status code and an error message saying the group was not found.

Editing a single resource
Now that you know how to retrieve information about a single resource, you can try to edit it. To do that, you need to send a PUT request to the /admin-api/customers/group/{customerGroupId} endpoint, where {customerGroupId} is the ID of the user group you want to edit. You need to provide the access token in the Authorization header and the data you want to change in the request body.
You can send the following JSON data to change the user group name:
{
    "localizedNames": {
        "1": "Odwiedzający - Edytowany",
        "2": "Visitor - Edited"
    }
}
Full curl request:
curl --location --request PUT 'http://yourdomain.test/admin-api/customers/group/1' \
--header 'Content-Type: application/json' \
--header 'Authorization: Bearer YOUR_ACCESS_TOKEN' \
--data '{
    "localizedNames": {
        "1": "Odwiedzający - Edytowany",
        "2": "Visitor - Edited"
    }
}'
If everything goes well, you should receive a response with information about the user group. The response should look like this:
{
    "customerGroupId": 1,
    "localizedNames": {
        "1": "Odwiedzający - Edytowany",
        "2": "Visitor - Edited"
    },
    "reductionPercent": 0.0,
    "displayPriceTaxExcluded": false,
    "showPrice": true,
    "shopIds": [
        1
    ]
}
Notice that the user group name has been changed. You can now use the same method to edit other resources in the API. Let’s now proceed to the next step.
Adding a new resource
Now that you know how to retrieve and edit information about a single resource, you can try to add a new resource. To do that, you must send a POST request to the /admin-api/customers/group endpoint. You need to provide the access token in the Authorization header and the data you want to add to the request body.
You can send the following JSON data to add a new user group:
{
    "localizedNames": {
        "1": "Nowa grupa",
        "2": "New group"
    },
    "reductionPercent": 0.0,
    "displayPriceTaxExcluded": false,
    "showPrice": true,
    "shopIds": [
        1
    ]
}
Full curl request:
curl --location 'http://yourdomain.test/admin-api/customers/group' \
--header 'Content-Type: application/json' \
--header 'Authorization: Bearer YOUR_ACCESS_TOKEN' \
--data '{
    "localizedNames": {
        "1": "Nowa grupa",
        "2": "New group"
    },
    "reductionPercent": 0.0,
    "displayPriceTaxExcluded": false,
    "showPrice": true,
    "shopIds": [
        1
    ]
}'
This time, you should receive a response with information about the newly created user group. The response should look like this:
{
    "customerGroupId": 4,
    "localizedNames": {
        "1": "Nowa grupa",
        "2": "New group"
    },
    "reductionPercent": 0.0,
    "displayPriceTaxExcluded": false,
    "showPrice": true,
    "shopIds": [
        1
    ]
}
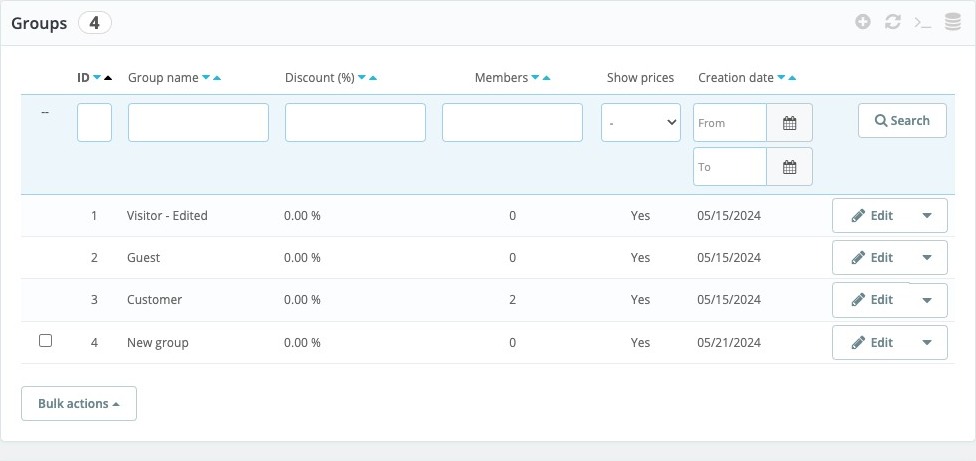
and you will see the new user group in the PrestaShop back office.
If you don’t provide all the necessary information, you will receive an error message. For example, if you try to add a new user group without providing the localizedNames parameter, you will receive the following response:

Deleting a single resource
To delete a resource, you need to send a DELETE request to the /admin-api/customers/group/{customerGroupId} endpoint, where {customerGroupId} is the ID of the user group you want to delete.
curl --location --request DELETE 'http://yourdomain.test/admin-api/customers/group/4' \
--header 'Authorization: Bearer YOUR_ACCESS_TOKEN'
Importing API collection to your API client
Thanks to the automatically generated documentation, you can easily import the API collection into Postman or another API client of your choice. You can find the collection in the http://yourdomain.test/admin-api/docs.json URL. The collection is available in the OpenAPI format, compatible with Postman and other API clients.
Extending API
The new API in PrestaShop 9 is designed to be extensible. You can add new endpoints, scopes, and other features to the API. We plan to release extensive developer documentation for the API soon. In the meantime, you can check the example module and the ps_apiresources.
Get involved
The new API in PrestaShop 9 is a significant step forward for the platform. It will provide developers with a modern, secure, and extensible API that will allow them to create new integrations and services. We encourage you to test the new API and provide feedback to help us improve it further.
If you are motivated to contribute to developing the new API, we encourage you to join the PrestaShop community. More information about contributing to PrestaShop is on the Contribute to PrestaShop page.
Let’s keep in touch on Slack
If you have any questions or feedback, come talk with us on Slack. We are always happy to help you with any issues you may have. You can join the #dev-core channel to discuss the new API in PrestaShop 9.