E2E testing from the trenches: Our new approach
Testing the last version of Prestashop before using it … a long story
This article is intended to catch you up with the most important changes in our testing framework. Terms, architecture, tools, and approaches to E2E testing in Prestashop in 2019.
It combines many good practices in testing well working at Prestashop where we implemented different testing solutions for different projects and contexts. I invite you to have a look on our previous article to refresh your memory.
But what are E2E tests?
In order to test and validate each release we can consider three categories of tests, that includes:
- Unit tests, to check input/output of our functions, methods and classes.
- Integration tests, to check that individual features work well with others.
- End-to-end tests, to check that entire features work well in terms of user’s perspective.
The last one concerns the main topic in this article, we call it sometimes functional or acceptance tests but it refers to the same word: E2E tests.
The most important thing in testing software is to check that this is working for users. Well written E2E tests let you know if at least on piece of a feature (product page, front-office UI, database,…) is not working as expected. This is extremely valuable because it saves a lot of time by avoiding manual checks on each context and each time a change is made.
If you want to run the tests or have an overview of the current stack, this is explained on GitHub, in the Test’s readme.md.
Introduction to Puppeteer
Puppeteer is one of the most trending testing tools in the web development community and hopefully made it easier for you to test your websites.

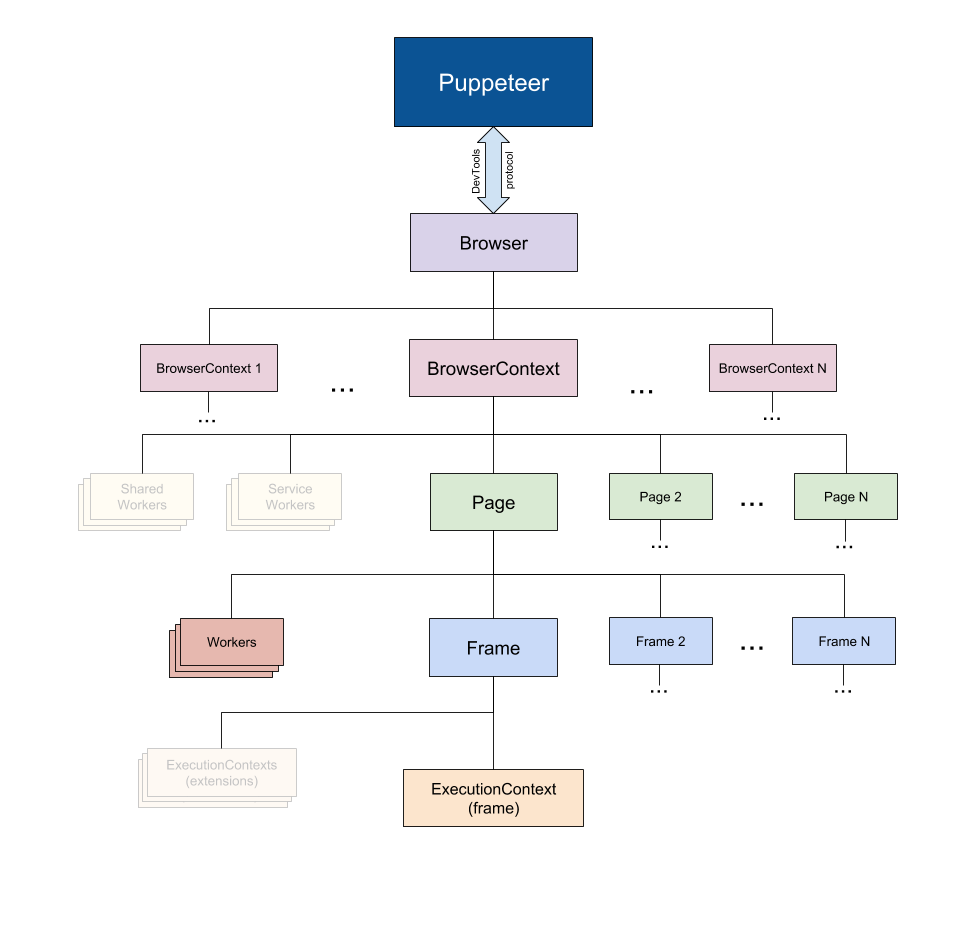
Puppeteer is a Node library which provides a high-level API to control Chrome or Chromium over the DevTools Protocol. Puppeteer runs everything in a headless (by default) Chrome instance, so you know you’ll be rendering things the same way you do in the Chrome browser, it is possible also to run it headfull. You can do anything that the tools can, and more, because now you have access to the objects that operate under the hood.
How Puppeteer tests look like ?
And now let’s see how we can control our browser with Puppeteer in Javascript through examples:
Example #1 - Take a simple screenshot in Prestashop Front Office: How can we take a screenshot of a prestashop page in less than 10 lines of codes? To begin create a new directory and use npm to install the Puppeteer library
mkdir prestashopTest
cd prestashopTest
npm install puppeteer
And now create a file prestasnapshot.js and copy/paste the code below:
const puppeteer = require("puppeteer")
const getPrestaShot = async () => {
  const browser = await puppeteer.launch()
  const page = await browser.newPage()
  await page.goto("http://fo.demo.prestashop.com/")
  await page.screenshot({ path: "prestashopsnap.png" })
  await browser.close()
}
getPrestaShot()
Run this script on your terminal with this command line
node prestasnapshot.js
Congrats you’ve just made your first script running on Front-Office page! Puppeteer could be also used as automation tool, so you can use it for long and recurrent manual tasks. Keep track on our next Pull requests we will share with you some interesting automation tests.
Strength of puppeteer
Puppeteer is really interesting for:
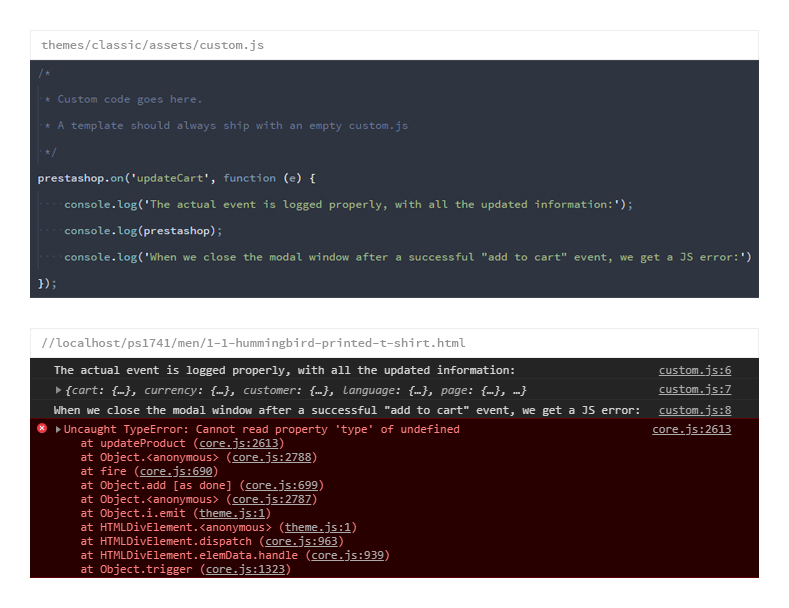
- Catching (non visual) JS errors and not only the presence of elements in a page while running a scenario
- Natively take screenshots and or create pdf document.
- Less NPM dependencies
- All-in-one puppeteer (chrome and all needed packages) no selenium-standalone server required (java, selenium-standalone, webdriver, chromedriver)
- Natively Headless <3 and work well with docker (no webdriver “Error: invalid session id”) Puppeteer launches Chromium in headless mode, but it’s also possible to launch Chromium in headfull mode by setting the ‘headless’ option when launching a browser:
const browser = await puppeteer.launch({headless: false}); // default is true
Why change?
Long story short: Sustainability
Since the official announcement of Chrome Headless, many of the industry standard libraries for automated testing have been discontinued by their maintainers like PhantomJS and Selenium IDE for Firefox which has been discontinued) due to lack of maintainers.
Puppeteer’s library is officially maintained from the Chrome DevTools team, with many contributions (see Contributing). This means it has a solid future. This also means it supports all modern JavaScript syntax available in Chrome (like async/await).
Main Selenium stack drawback
Tests:
- Lot of false flags
- Stack unstable (need many updates)
- The headless mode seems to have some difficulties
Installations and dependencies required:
- Selenium-standalone
- Java
- Chromedriver
- Xwebdriverio
The new Nightly Builds & Tests Dashboard
Aside from the classic tests, a new dashboard has been introduced recently with the automatic nightly builds. A report is joined when the testing suite was able to run. You can find it at this brand new URL: https://nightly.prestashop-project.org/
With a quick look, you can identify if tests have been done on a successful build, how much tests failed, and there is a link to download the entire report. Once a report is open in your browser, click on the left menu icon to use the filters. There, you can find code to improve, or tests to fix ;-)
Puppeteer + Mocha in our E2E stack architecture
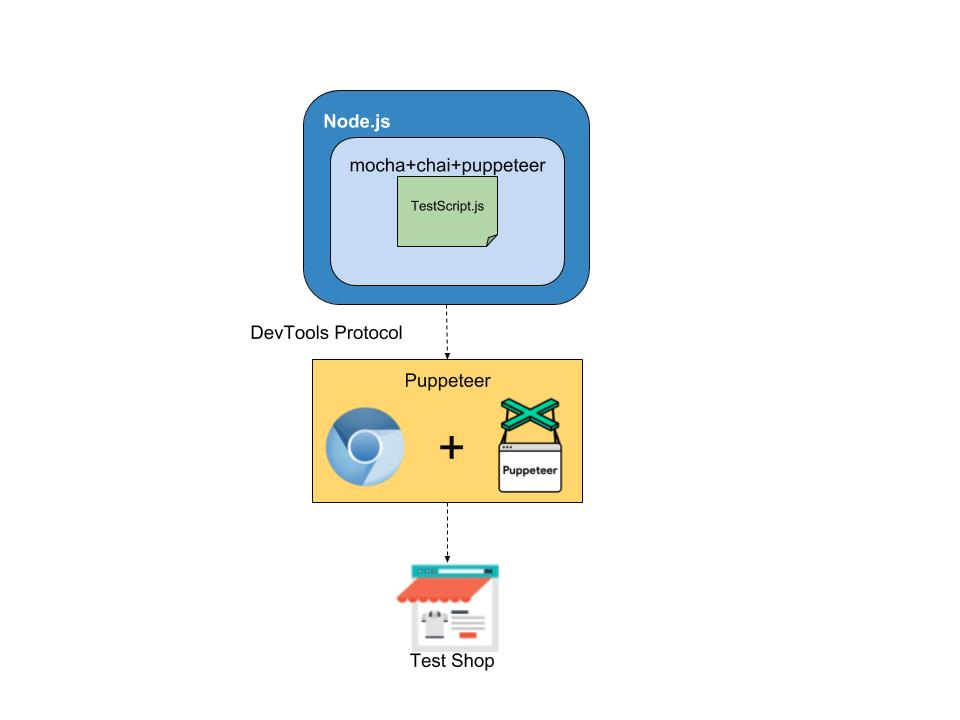
E2E testing is traditionally not easy to maintain, but beginning to use Chrome headless made our tests more reliable, faster and simpler here @Prestashop. It is a real pleasure to test with Puppeteer and I recommend you to try it out on your Prestashop.
<3 From QA Team with love <3